How to Make DTF Transfers with Inkjet Printer
A Complete DIY Guide Printer Inkjet
The world of custom apparel has been revolutionized by Direct-to-Film technology. Many creators are now learning Printer Inkjet setups to save on production costs. This method allows you to create high-quality, full-color designs from your own desk. You can apply these transfers to cotton, polyester, and even dark-colored fabrics with ease. However, you cannot use a standard printer straight out of the box. A specific conversion process and specialized supplies are required for success. This guide will walk you through the entire transformation and production cycle. We will cover the equipment, the software, and the physical steps to create professional transfers.
Can Any Printer Inkjet Work for DTF?
The most common question beginners ask is whether their current home printer is compatible. The answer depends on the printhead technology and the ability to handle specialized inks.
The Importance of Piezo Printheads To learn How to Make DTF Transfers with Printer Inkjet models, you must choose a machine with a Piezo printhead. Most Epson EcoTank and Photo printers use this technology. Unlike thermal printheads, Piezo heads use mechanical pressure to eject ink. This is necessary because DTF textile inks are thicker than standard document inks. If you use a thermal printer, the heat will cause the textile ink to clog the nozzles almost instantly.
The Necessity of White Ink Standard inkjet printers only have Cyan, Magenta, Yellow, and Black (CMYK) channels. For DTF, you must have a white ink channel to create a base for your designs. Without this white layer, your colors will disappear into the fabric of dark shirts. This usually involves converting a six-color printer (like the Epson L1800 or ET-8550) to use two channels for white ink.
Printer Inkjet Essential Equipment Checklist for Your Home Setup
Building a DIY station requires a specific set of tools that fit within a home environment.
-
Converted Epson Printer: A modified EcoTank or Stylus Photo model.
-
DTF Ink Set: Specialized textile pigments including high-opacity white.
-
PET Film Sheets: Transfer films with a special coating for ink absorption.
-
Adhesive Powder: Hot-melt TPU powder that acts as the bonding agent.
-
RIP Software: Specialized software to manage the white ink layer and color density.
-
Heat Press or Curing Oven: To melt the powder and apply the design to the garment.
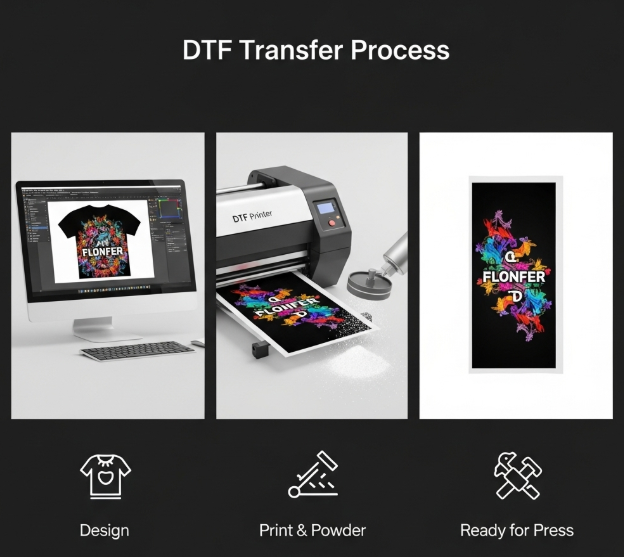
Step 1: Preparing Your Printer and Software
Before you print your first film, your digital and physical setup must be perfectly aligned.
Converting the Ink Tanks If you are using a new EcoTank, do not fill it with the ink that came in the box. Instead, fill the tanks with specialized DTF inks. If the printer was previously used, you must thoroughly flush the system. To keep your converted machine in top shape, you should use professional maintenance tools. You can find these in the
Setting Up the RIP Software You cannot use the standard "Print" button in Windows or macOS. You need a Raster Image Processor (RIP) like AcroRIP or Cadlink. This software tells the printer to lay down the CMYK colors first and then a solid white layer over them. It also allows you to mirror your design, which is a mandatory step in How to Make DTF Transfers with Inkjet Printer production.
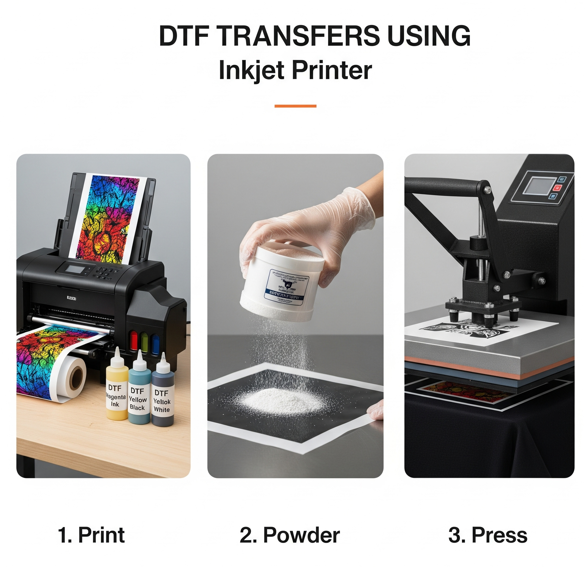
Step 2: The Printing Process
Now that your machine is ready, you can begin printing on your PET film.
Loading the Film Correctly Check your film for the matte, coated side. This is the side that will receive the ink. Load it into the printer carefully, ensuring it is flat and straight. Avoid touching the coating with your fingers, as skin oils can ruin the ink adhesion.
Monitoring the Output As the printer works, you will see the colors appear followed by a thick layer of white. The white ink must be wet when it leaves the printer. If the ink dries too fast, the powder will not stick. Using high-quality ink is vital for this stage. You can explore the
Step 3: Powdering and Curing
This stage turns your wet print into a durable transfer that is ready for heat application.
The Shake Method While the ink is still wet, place the film in a plastic bin. Pour the DTF adhesive powder over the entire design. Tilt the film back and forth until the ink is completely covered. Gently tap the film to remove any extra powder from the clear sections. For the best bond, you should use premium powders. Check out the
Curing the Adhesive The powder needs to melt to become an effective glue. You can use a dedicated curing oven or your heat press. If using a heat press, hover the top plate about 1 inch above the film for 2 to 3 minutes at 325°F. The powder is cured when it looks like melted orange peel. This is a critical step in learning How to Make DTF Transfers with Inkjet Printer.
Step 4: Pressing the Transfer to Fabric
The final step is applying your homemade transfer to a t-shirt or hoodie.
Pre-Pressing the Garment Place your shirt on the heat press for 5 seconds. This removes moisture and wrinkles, ensuring a perfect bond.
The Final Press Place your cured film on the shirt with the design facing down. Cover it with parchment paper and press for 15 seconds at medium pressure. Most DIY films are "Cold Peel," so wait for the shirt to cool down completely before removing the film. Finish with a second 5-second press to lock the design into the fabric.
Expanding Your Craft with UV DTF
Once you have mastered fabric transfers, you might want to brand hard surfaces like mugs or electronics. UV DTF technology is the perfect next step. For these projects, using
Maintenance: The Key to Long-Term Success
A converted inkjet printer requires daily care. If you leave it sitting for too long, the white ink will settle and clog the printhead.
-
Daily Shake: Gently shake your white ink tanks every morning.
-
Nozzle Checks: Run a test print every day to keep the ink flowing.
-
Humidity Control: Keep your workspace at roughly 50% humidity to prevent ink drying inside the nozzles.
Printer Inkjet Conclusion
Learning How to Make DTF Transfers with Printer Inkjet setups is a rewarding challenge. It gives you the power to create professional-grade custom apparel with a relatively small investment. By choosing the right printer, using high-quality inks, and maintaining your equipment, you can achieve results that rival big print shops. Whether you are making gifts or starting a brand, the flexibility of DTF will take your creativity to the next level.
Join our growing community online to stay updated with the latest trends and innovations in the printing world. Follow us on