How to Make Your Own DTF Transfers
A Complete Industry Guide DTF Transfers
The world of custom apparel has been transformed by Direct-to-Film technology. Many creators now want to learn How to Make Your Own DTF Transfers to gain full control over their production. This process allows you to bridge the gap between complex screen printing and simple vinyl cutting. It offers the ability to produce high-resolution, full-color designs that work on almost any fabric. Whether you are a small business owner or a dedicated hobbyist, mastering this craft is a game-changer. This guide provides a deep dive into the technical steps, equipment needs, and professional secrets for success.
The Evolution of Custom DTF Transfers
Before diving into the "how-to," it is important to understand why this method is so popular. Traditional methods often have limitations regarding color or fabric type.
Why DIY DTF? When you learn How to Make Your Own DTF Transfers, you eliminate the need for third-party suppliers. You can print a single shirt or a hundred on demand. The results are incredibly durable and stretchable. Unlike sublimation, which only works on light-colored polyester, DTF works perfectly on black cotton, nylon, and leather. This versatility is what makes it the preferred choice for modern garment decorators.
Phase 1: Setting Up Your Workspace and Equipment
You cannot produce high-quality transfers without the right hardware. A standard office setup will not suffice for this textile-based process.
-
The Printer: Most DIYers use a converted inkjet printer or a dedicated DTF machine. These printers must have a white ink channel.
-
RIP Software: This is the brain of your operation. It manages color profiles and ensures the white ink base is printed correctly behind the CMYK colors.
-
Consumables: You will need specialized DTF inks, PET film sheets, and hot-melt adhesive powder.
-
Climate Control: DTF printers are sensitive to their environment. Aim for a room with 40-60% humidity to prevent the ink from drying inside the printhead.
Phase 2: Digital Design and Preparation
Every successful transfer starts with a perfect digital file. This is the first practical step in How to Make Your Own DTF Transfers.
High-Resolution Artwork Always work with files at 300 DPI or higher. Use software like Adobe Illustrator or Photoshop to create your designs. It is vital to use a transparent background. If your file has a stray white pixel or a background box, the printer will apply white ink to those areas. This results in a "sticker" feel rather than a soft textile print.
The Mirror Image Rule In the RIP software, you must mirror your image. Because the transfer is applied face-down onto the fabric, the print must be a reflection of the final result. Proper software will also allow you to adjust the "white underbase." This layer is what makes your colors pop on dark garments.
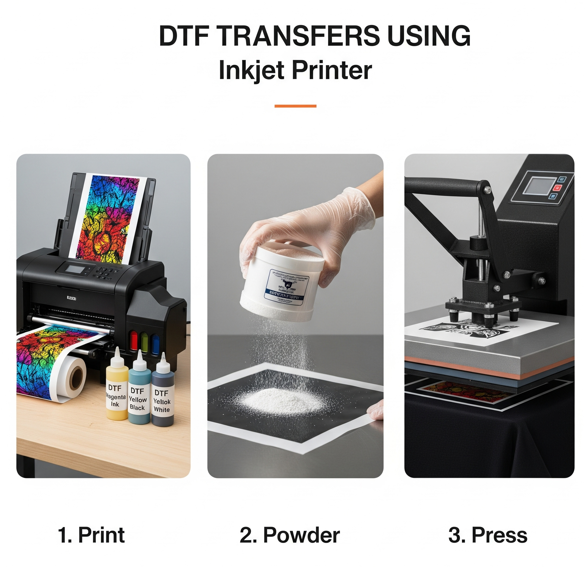
Phase 3: The Printing Process
Once your design is ready, it is time to put ink on film. This phase requires precision and careful handling.
Loading the PET Film Identify the coated side of your film. This matte surface is chemically treated to hold the wet ink. Avoid touching this surface with your bare hands, as skin oils can cause the ink to bead or skip. Load the film into the printer carefully to ensure it feeds straight.
Printing the Layers The printer will lay down the color pigments first. Then, it immediately covers those colors with a solid layer of white ink. This is the most critical part of knowing How to Make Your Own DTF Transfers. To ensure your designs stay vibrant and your printer stays healthy, you should use premium supplies. You can explore the
Phase 4: Applying the Adhesive Glue
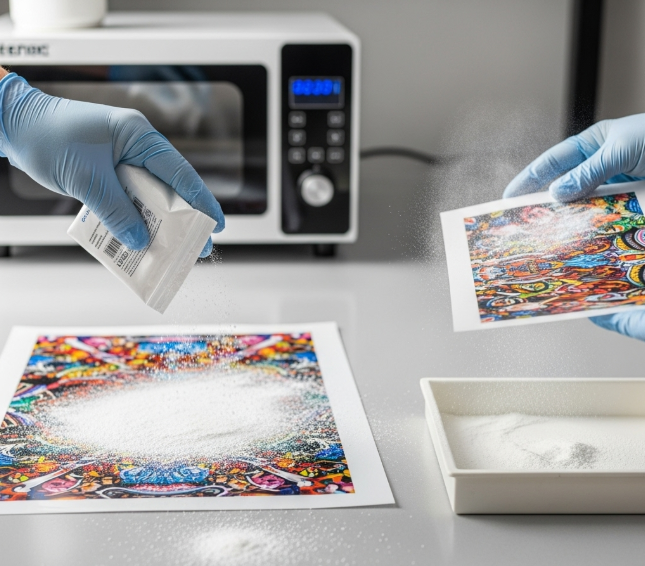
While the white ink is still wet, you must apply the bonding agent. This is what turns a print into a transfer.
The Powder Application Place your wet print into a container and cover it with DTF adhesive powder. Ensure the powder slides over every part of the wet ink. This powder is the "glue" that will eventually bond with the fabric fibers. For the best durability and wash-resistance, you should choose high-quality adhesives. You can check the
Removing Excess Powder Gently flick the back of the film or use a dedicated shaker machine. You want the powder to stick only to the ink. Any stray powder left on the clear film will leave white dots or a "halo" effect on your finished shirt. A clean film is the hallmark of a professional-grade transfer.
Phase 5: Curing the DTF Transfers
The powder must be melted before the transfer can be used. This process is called curing.
Temperature and Timing You can use a curing oven or the hovering method with a heat press. Typically, curing takes 2-3 minutes at 150°C (302°F). The powder should melt until it has a smooth, orange-peel texture. If it is under-cured, it won't stick. If it is over-cured, the adhesive will become brittle and lose its stretch.
Testing the Cure A properly cured transfer can be touched once it cools. It should feel flexible and slightly rubbery. You can store these cured transfers in a cool, dry place for several months. This allows you to build an inventory of designs that are ready to press at any time.
Phase 6: Maintenance and Long-Term Success
A DIY DTF setup requires consistent maintenance. Unlike standard printers, textile printers cannot sit idle for long periods.
Daily Maintenance Rituals You must shake your white ink tanks every day to prevent pigment settling. Running a daily test print or a nozzle check is mandatory. If you notice clogs or streaks, you need specialized tools to fix them. You can find everything you need in the
Expanding Your Skills Once you are comfortable with fabric, you might want to try hard surfaces. UV DTF technology allows you to apply designs to mugs, metal, and glass. For these projects, using
DTF Transfers Conclusion
Learning How to Make Your Own DTF Transfers is a journey of both art and science. It requires a balance of digital design skills and technical mechanical maintenance. By following these steps and using high-quality inks, powders, and cleaning supplies, you can produce apparel that rivals any commercial brand. The ability to create your own transfers gives you total creative freedom. Start small, maintain your equipment daily, and soon you will be producing professional-level custom products from your own workspace.
Join our growing community online to stay updated with the latest trends and innovations in the printing world. Follow us on