How to Apply DTF Transfers

How to Apply DTF Transfers
A Step-by-Step Guide
Direct-to-Film (DTF) transfers have become increasingly popular in the world of custom printing. These transfers offer vibrant, high-quality designs that can be applied to a variety of materials, making them perfect for creating personalized apparel, accessories, and more. If you're wondering how to apply DTF transfers successfully, you're in the right place! Here's a step-by-step guide to help you achieve flawless results every time.
What Are DTF Transfers?
DTF transfers are designs printed on a special film using a DTF printer. The design is then coated with a layer of adhesive powder, which is melted during the transfer process. The result is a durable, vibrant print that can be applied to various fabrics, including cotton, polyester, and blends.
How to Apply DTF Transfers
Materials You’ll Need:
Before you begin, gather the following materials:
-
DTF transfer prints (already printed with the design)
-
Heat press machine
-
Transfer film
-
Heat-resistant tape (optional)
-
T-shirt or garment to apply the transfer to
-
Parchment paper or Teflon sheet (for added protection)
How to Apply DTF Transfers
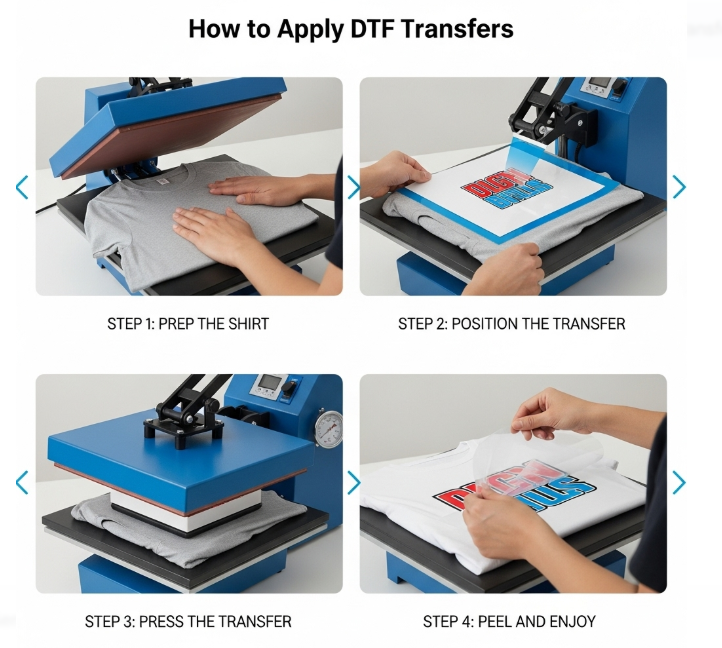
Step-by-Step Instructions for Applying DTF Transfers
Step 1: Preheat the Heat Press
Start by preheating your heat press to the appropriate temperature for the fabric you're working with. The typical temperature range for DTF transfers is between 160°C to 180°C (320°F to 350°F). Check the guidelines provided with your specific transfer film for the ideal temperature.
Step 2: Prepare the Garment
Ensure that the garment you're applying the transfer to is clean and wrinkle-free. You can use a lint roller to remove any dust or lint, which can affect the quality of the print. If necessary, pre-press the fabric for 5-10 seconds to remove any moisture or wrinkles.
Step 3: Position the DTF Transfer
Carefully place the DTF transfer onto the garment. Align the transfer to ensure it's centered and positioned exactly where you want it. If you’re using a heat press with a lower platen, you can carefully slide the transfer into position.
Tip: You can use heat-resistant tape to secure the transfer if you're worried about shifting during the press.
Step 4: Apply the Heat Press
Once the transfer is in place, lower the heat press onto the garment. Apply firm pressure for about 15-20 seconds. The exact time will depend on the fabric and the size of your design. Be sure to follow the recommended time for your specific transfer film and material.
Step 5: Cool and Peel the Film
After pressing, allow the transfer to cool for a few seconds. When it's cool enough to touch, gently peel the transfer film from the garment. The adhesive should have bonded with the fabric, leaving a clean, vibrant design.
Note: If the transfer isn’t completely adhered, you may need to re-press for an additional 5-10 seconds.
Step 6: Post-Pressing (Optional)
For an extra smooth finish, you can place a sheet of parchment paper or a Teflon sheet over the design and press it again for 5 seconds. This helps to seal the transfer and ensures it lasts longer.
Tips for Achieving the Best Results with How to Apply DTF Transfers
-
Choose High-Quality Transfer Materials:
The final outcome of your design largely depends on the quality of the materials used. Opt for top-notch transfer films and inks to ensure sharp, vibrant, and long-lasting prints. The better the products, the better the results. -
Test Fabric Compatibility:
While most fabrics work well with DTF transfers, it’s always a good idea to test the process on a small swatch first. This will help you determine if the fabric adheres well to the transfer and prevents any surprises during the main application. -
Maintain the Right Temperature and Pressure:
Finding the perfect balance of heat and pressure is key. Too much heat or pressure can cause the design to melt or burn, while insufficient heat or pressure can result in improper adhesion. Stick to the manufacturer’s recommended settings for optimal results. -
Proper Care After Application:
Once your design is transferred, it’s important to follow care instructions to preserve the quality of the print. Always wash garments inside out in cold water and avoid using harsh detergents or bleach, which can damage the design.
How to Apply DTF Transfers - Conclusion
Transferring your designs with DTF technology is a simple yet effective way to create high-quality, custom prints on a variety of fabrics. By using the right materials, equipment, and following the correct application process, you can consistently achieve beautiful results. Whether you’re printing for personal projects or creating custom items for your business, this method provides an excellent way to bring your creativity to life.
Enjoy the process and happy printing!

%20transfers%20have%20become%20increasingly%20popular%20in%20the%20world%20of%20custom%20printing.%20These%20transfers%20offer%20vibrant,%20high-quality%20desig...)