How to Apply DTF Transfers with Iron
A Complete DIY Guide DTF Transfers
Many people want to create custom shirts at home. You do not always need an expensive heat press. Knowing How to Apply DTF Transfers with Iron is a great skill. It allows you to make professional-looking clothes using basic tools. However, using a household iron is different from using professional equipment. You must be very careful with heat and pressure. If you follow the right steps, your designs will be durable. This guide will teach you the best techniques for home application.
Can You Really Use a Household Iron for DTF?
The short answer is yes. DTF transfers are very versatile. They rely on heat-activated adhesive powder. A standard clothes iron can provide enough heat to melt this glue.
The Challenges of Using an Iron The main problem with an iron is inconsistent heat. Most irons have holes for steam. These holes do not produce any heat. Also, an iron is smaller than a full design. You have to move it around to cover the whole area. This makes it harder to get even pressure. However, if you understand these limits, you can still get great results. Learning How to Apply DTF Transfers with Iron is all about patience.
Preparing Your Workspace and Tools
Before you start, you need to set up a proper station. Do not use a soft ironing board.
Find a Hard Surface A soft board will absorb the pressure you apply. You need a solid, flat surface like a wooden table or a stone counter. Place a thin pillowcase or a piece of parchment paper on the surface. This protects the table from heat. A hard surface ensures that the adhesive pushes deep into the fabric.
Check Your Iron Settings Make sure your iron is empty of water. You must turn off all steam settings. Steam will ruin the DTF transfer instantly. Set your iron to the "Cotton" or "High" setting. Usually, this is around 300°F to 320°F. Let the iron heat up for at least five minutes before starting.
Step-by-Step Instructions: How to Apply DTF Transfers with Iron
Follow these steps carefully to ensure your design sticks forever.
Step 1: The Pre-Press Lay your shirt flat on your hard surface. Run the iron over the printing area for 5 to 10 seconds. This removes any moisture from the fabric. It also smooths out wrinkles. A dry, flat surface is essential for a good bond.
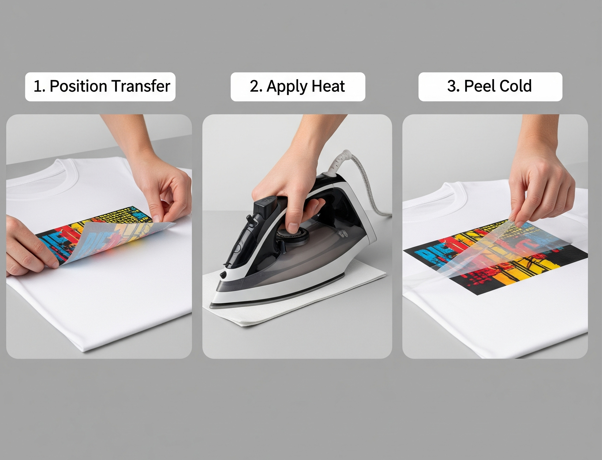
Step 2: Position Your Transfer Place your DTF film on the shirt with the image facing up. Take your time to align it perfectly. Once you apply heat, you cannot move it. You can use small pieces of heat-resistant tape to hold it in place.
Step 3: Applying Heat and Pressure Place a piece of parchment paper over the transfer. This protects the plastic film from melting onto your iron. Press the iron down firmly on one section of the design. Do not slide the iron back and forth like you are ironing a shirt. Instead, press down with your body weight for 15 to 20 seconds. Move to the next section and repeat until the whole design is covered.
Critical Tips for Even Pressure
Since the iron has steam holes, you must be strategic.
The Overlap Method When moving the iron, overlap the previous section. This ensures that the areas under the steam holes eventually get direct heat. Focus on the edges and corners of the design. These are the areas most likely to peel. How to Apply DTF Transfers with Iron requires more time than a heat press. You might need to go over the entire design two or three times.
Use Your Body Weight Don't just hold the iron. Lean into it. You need firm pressure to force the adhesive into the fibers. If you have a small "mini-iron," use it for the fine details.
The Peeling Process: Cold vs. Hot
Most DTF transfers are "Cold Peel." This is especially important when using an iron.
Wait for it to Cool After you finish pressing, let the shirt sit. Do not touch the film for at least two minutes. It must be completely cold to the touch. If you peel it while it is warm, the design might lift. This is the most common mistake in the How to Apply DTF Transfers with Iron process.
The Slow Peel Start at one corner and peel very slowly. If you see the design lifting, stop immediately. Put the film back down and press that area again with the iron for 10 seconds. Let it cool again and try once more. Patience will save your shirt from being ruined.
The Finishing Press: Don't Skip This!
The second press is what makes the design feel soft and last through washes.
Locking it In Once the film is removed, place the parchment paper back over the design. Press the entire image one last time with the iron for 15 seconds. This "sets" the ink into the fabric. It removes the shiny plastic look and gives it a professional matte finish. It also improves the "hand feel" of the garment.
Troubleshooting Common Iron-On Issues
If your transfer isn't working, check these factors.
-
Design Peels After Washing: This means you didn't use enough pressure or heat. Increase your pressing time next time.
-
Fabric Scorching: If your shirt turns yellow, the iron is too hot. Lower the setting and use a thicker piece of parchment paper.
-
Bubbles in the Design: This is usually caused by trapped moisture. Always do a longer pre-press to dry the fabric.
Learning How to Apply DTF Transfers with Iron takes practice. Try a small test design on an old rag before working on a nice shirt.
Caring for Your Ironed-On DTF Shirts
To make your DIY shirts last, you must wash them correctly.
Wash Inside Out Always turn the garment inside out before putting it in the machine. This protects the print from rubbing against other clothes. Use cold water and a gentle cycle.
Avoid the Dryer if Possible High heat in a dryer can eventually weaken the adhesive. Air drying is best. If you must use a dryer, use the lowest heat setting. Never iron directly on the design after it is finished. If the shirt is wrinkled, iron it from the inside.
Conclusion
You don't need a factory to make great custom apparel. Knowing How to Apply DTF Transfers with Iron opens up many creative possibilities. It is perfect for birthday shirts, small gifts, or starting a hobby. Remember to use a hard surface, turn off the steam, and apply heavy pressure. Always wait for the film to cool before peeling. With these tips, your home-made shirts will look just as good as those from a professional shop.
Join our growing community online to stay updated with the latest trends and innovations in the printing world. Follow us on
Bringing your custom designs to life with professional quality has never been easier. For high-resolution and durable prints, visit our